Have you ever walked down a bare hallway in your home and thought, “This space needs some love”? Well, that’s exactly what Kristen Buckhout of @livedin_interiors did when she transformed her once boring white hallway into a show-stopping space filled with charm, creativity, and personality. Using wainscoting and our Riverside Meadows Wall Mural, Kristen gave her hallway a magical makeover that we can’t wait to share with you. Ready for some inspiration? Let’s dive into this dreamy DIY!
From Drab to Fab: Kristen's Vision

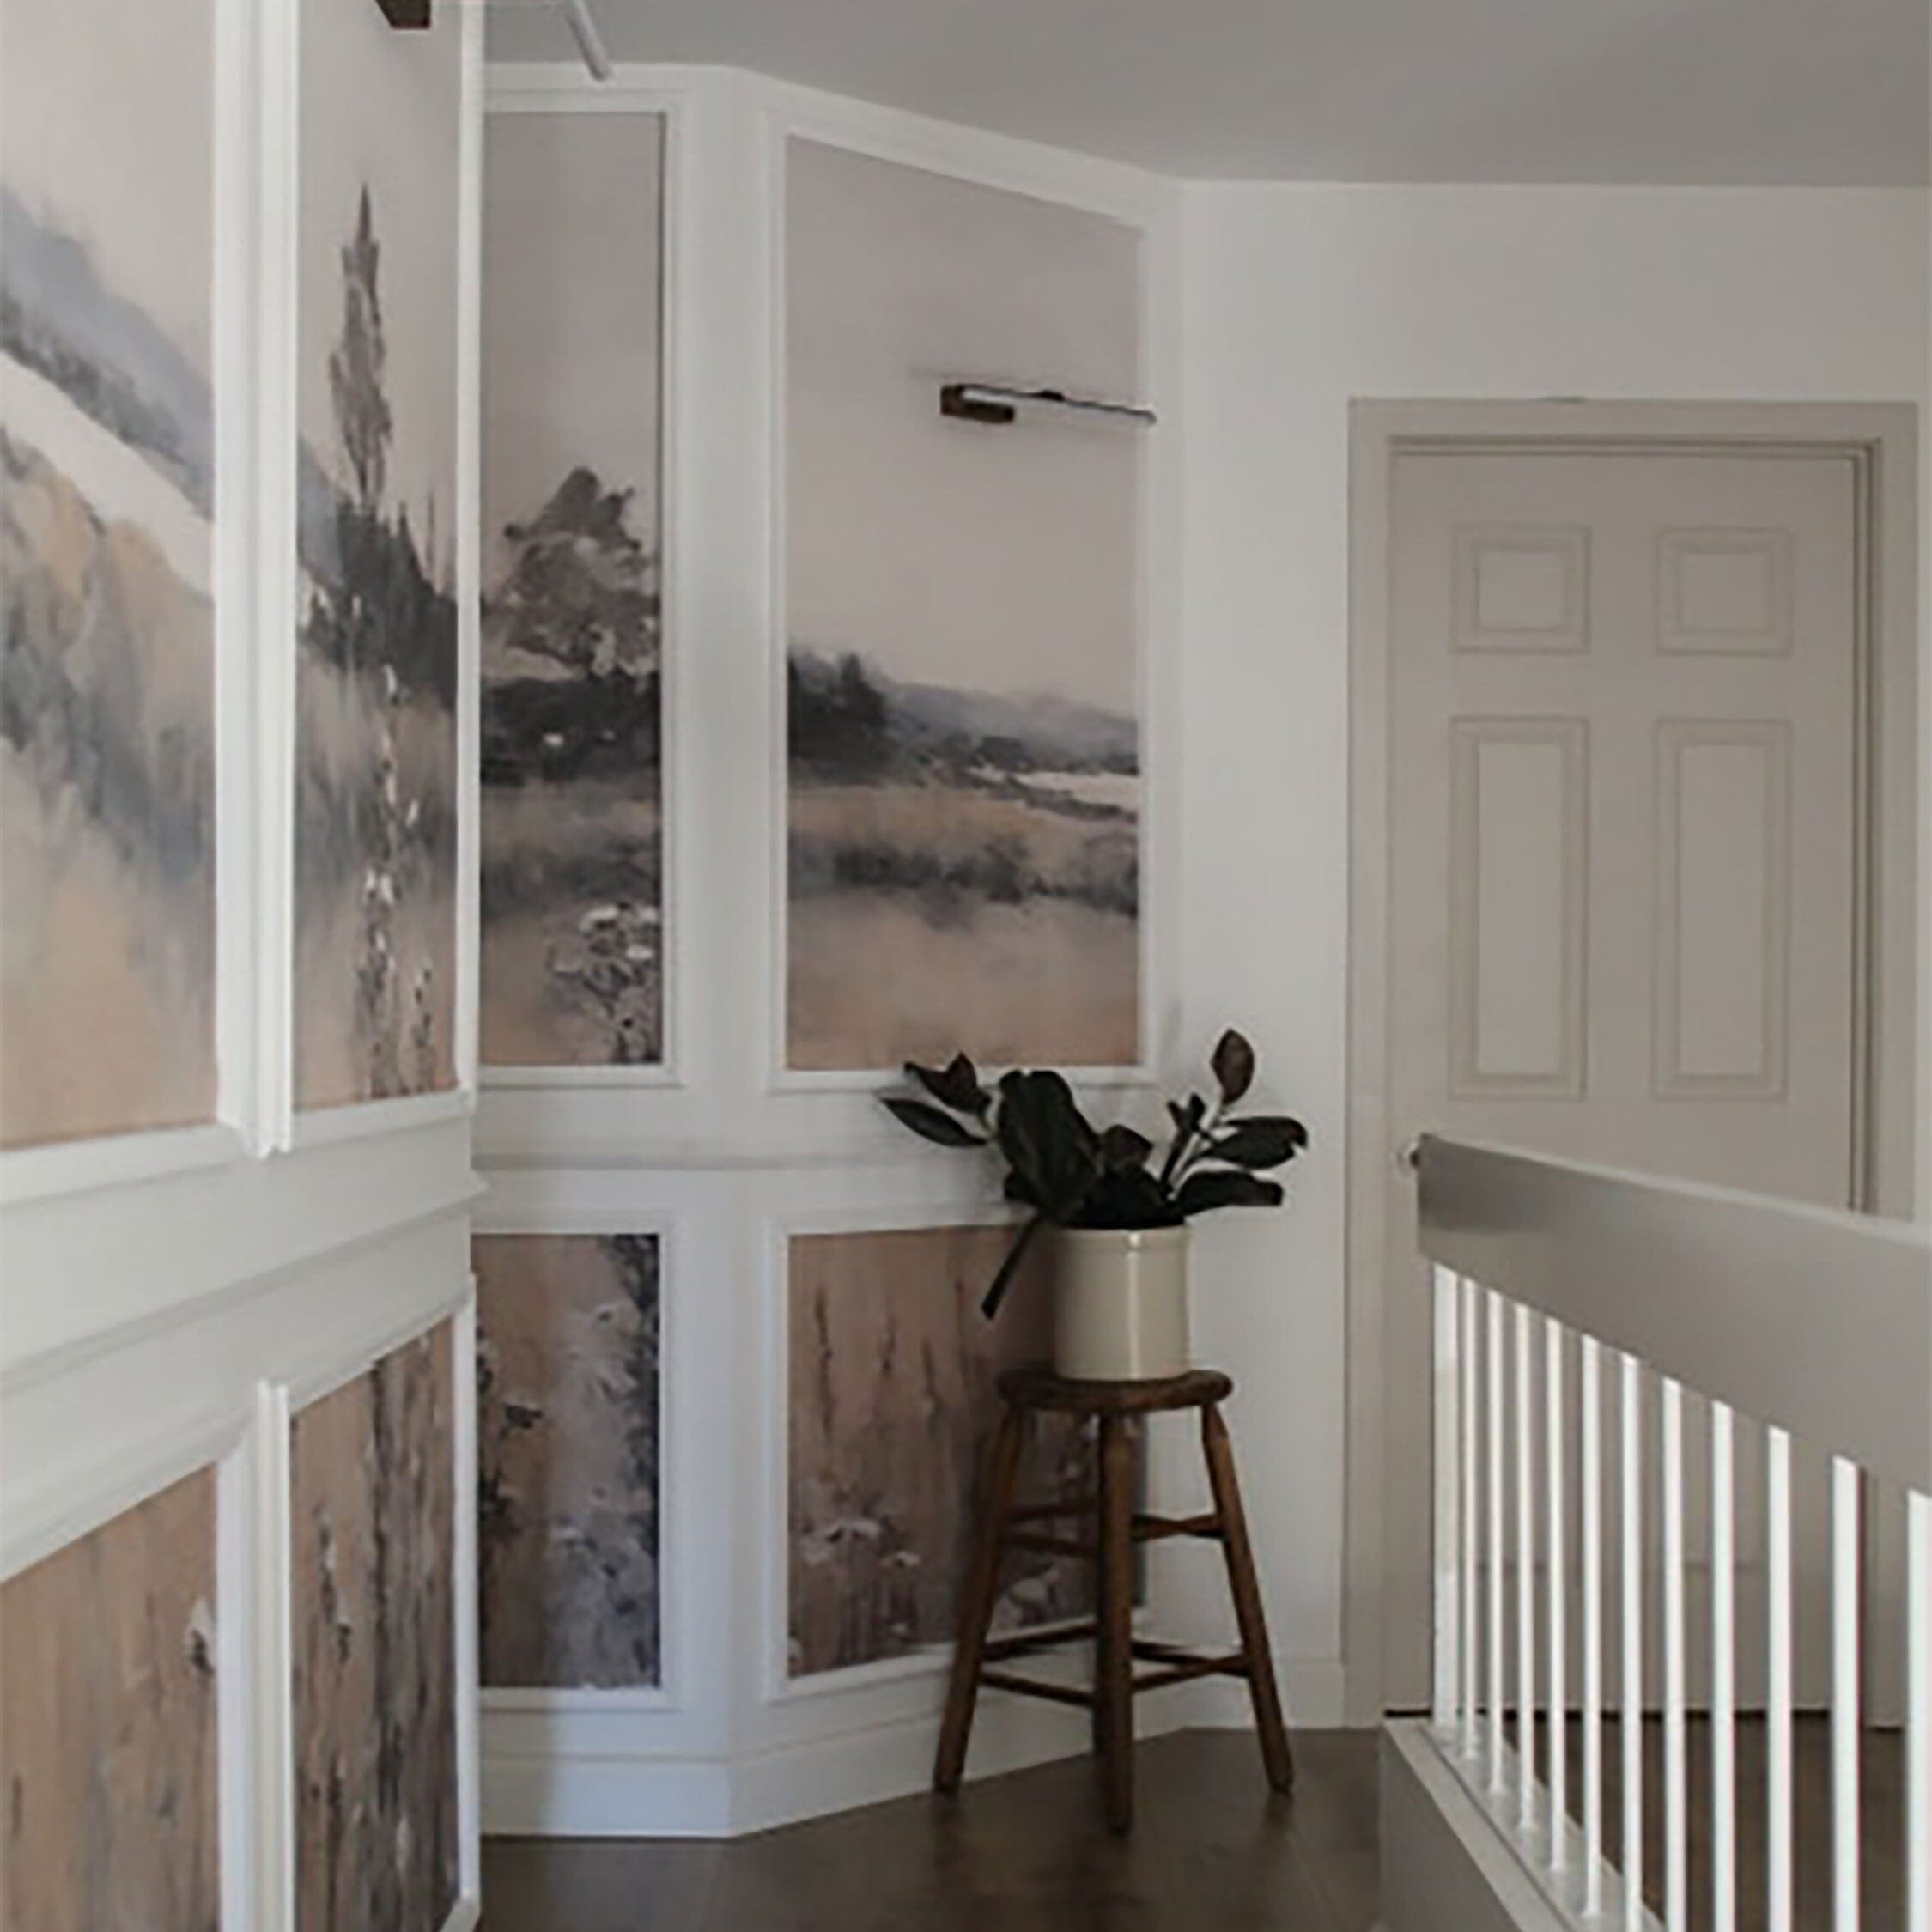
Kristen’s hallway was nothing more than a blank slate – white walls, no character, and certainly no personality. But instead of settling for the mundane, she decided to give it a complete overhaul. Inspired by the serene beauty of nature, she wanted to incorporate a mural that would bring warmth and tranquility to her home, and our Riverside Meadows Wall Mural was the perfect fit. But Kristen didn’t stop there; she wanted to make her hallway truly unique, so she installed wainscoting and placed the mural panels within each section, creating a visual masterpiece that flows effortlessly from one end of the hall to the other.
What is a Wall Mural, Anyway?
You may be wondering, “What’s the difference between a wallpaper and a wall mural?” Well, unlike removable wallpaper, which repeats the same pattern with each panel, a mural is designed as one continuous scene. Each panel contributes to the larger picture, creating a stunning, cohesive design. In the case of the Riverside Meadows Wall Mural, it’s a nature-inspired masterpiece that captures the beauty of a golden meadow, complete with warm hues and soft watercolor strokes. Think of it as bringing a serene, vintage-inspired landscape right into your home.
Why Choose the Riverside Meadows Wall Mural?

Let’s talk about the mural that made Kristen’s hallway transformation possible. Our Riverside Meadows Wall Mural isn’t your average wall decor – it’s a work of art. This mural features a sprawling meadow scene with soft, golden fields that evoke feelings of tranquility and calm. The watercolor design gives it a vintage, yet timeless look that pairs beautifully with both modern and classic decor. It’s perfect for anyone looking to create a peaceful, nature-inspired retreat within their home.
Here’s a breakdown of what makes the Riverside Meadows Wall Mural so special:
- Nature-inspired design: Golden fields, soft hues, and watercolor landscapes make this mural an eye-catching addition to any space.
- Seamless installation: Each panel is custom-designed to fit perfectly, creating a continuous scene across your walls.
- Removable and renter-friendly: Our murals are peel-and-stick, meaning you can easily remove them without damaging your walls – perfect for renters or those who like to switch up their decor.
- Durable and high-quality: Crafted from premium materials, this mural is designed to withstand the test of time, making it a long-lasting investment in your home decor.
Wainscoting + Mural: A Match Made in DIY Heaven

Wainscoting has long been a favorite design element for those looking to add elegance and depth to their walls, and Kristen used this classic feature to frame each panel of the Riverside Meadows mural. The combination of wainscoting and mural adds dimension and interest, turning what was once a simple hallway into a space full of charm and sophistication.
But, Kristen didn’t stop at just adding wainscoting. She wanted to make sure that every inch of her hallway was bursting with character. To achieve this, she customized the mural panels to fit perfectly within the wainscoting, allowing the artwork to flow seamlessly from one section to the next. It was a bold move that paid off beautifully, and the result is nothing short of magical.
Installation Made Easy: How Kristen Did It
One of the reasons Kristen chose our Riverside Meadows Wall Mural was for its ease of installation. The mural panels come in easy-to-handle sections, and since they’re peel-and-stick, there’s no need for glue, water, or any messy adhesive. With her textured walls and unique hallway measurements, Kristen worked with our team to customize the mural for a flawless fit. The result? A perfectly aligned mural that sits snugly within each wainscoted section of the hallway.
To install, Kristen simply measured each section of the wall, cut the mural panels to size, and peeled the backing off to stick them in place. Using a squeegee, she smoothed out any air bubbles, ensuring a seamless application. And voila! In just a few hours, Kristen had completely transformed her hallway into a nature-inspired oasis.
Ready for a quick room refresh? CLICK HERE to watch how easy it is to install our peel and stick wall murals!
A Fun DIY Project for Any Space
Kristen’s hallway transformation isn’t just about wainscoting and murals – it’s about thinking outside the box and getting creative with your space. Whether you have a hallway, living room, bedroom, or even a bathroom that needs some love, adding a mural can be an easy and impactful way to breathe new life into your home. And with our removable wall murals, you don’t have to worry about making permanent changes. They’re easy to install, easy to remove, and easy to love!
What Kristen Had to Say
Of course, we couldn’t finish this post without sharing Kristen’s own thoughts on her DIY hallway project: "Thanks so much for a fun collaboration! Hope your following was just as inspired to think outside of the box!"
We couldn’t have said it better ourselves! It’s always such an honor to be included in our customers’ homes, especially when it comes to special projects like this one. Kristen’s vision to create a hallway that is both beautiful and inspiring truly came to life with the help of our Riverside Meadows mural, and we hope it inspires you to get creative with your own space!
Transform Your Home with Urbanwalls
Are you ready to transform your home with a removable wall mural? Whether you’re looking to create a peaceful retreat, add a touch of elegance, or make a bold statement, we’ve got the perfect mural for you. Explore our collection of removable wall murals today and see how easy it is to bring your walls to life.
Final Thoughts

Kristen’s DIY hallway project is proof that you don’t need to settle for plain, boring walls. With a little creativity, the right materials, and a vision, you can completely transform your space into something truly special. Whether it’s adding wainscoting, installing a mural, or both, the possibilities are endless!
So, what are you waiting for? Grab your tools, pick out your favorite mural, and get started on your own DIY transformation today!


